
How to Set Up a Prosody XMPP Server
A complete, practical guide for Ubuntu and Debian.
If you want a chat service you control without building a messaging platform from scratch, Prosody is one of the cleanest places to start. This guide shows you how to set up a Prosody XMPP server on Ubuntu or Debian, connect it to a real domain, secure it with TLS, create users, enable group chat and file sharing, and verify that the whole setup works.
The commands are designed for a small personal server, but the structure also works for a private team or community. You do not need deep Linux knowledge; you do need a VPS, a domain name, SSH access, and the patience to replace every example domain with your own.
What you will have at the end A working account such as alice@chat.example.com, encrypted client connections, optional federation with other XMPP servers, private account creation, group rooms, file upload, and a repeatable health-check routine.
What Prosody and XMPP actually do
XMPP is an open standard for real-time messaging and presence. It is decentralized: one server can communicate with another server in much the same way that email servers exchange mail. A user is identified by a Jabber ID, or JID, such as alice@chat.example.com.
Prosody is the server software. It accepts connections from XMPP clients, authenticates users, routes messages, stores selected data, advertises services such as chat rooms, and optionally federates with other XMPP domains. Prosody is lightweight and its configuration files are readable Lua-style text files, which makes it a good fit for a personal server.
XMPP itself is not the same thing as end-to-end encryption. TLS protects the connection between clients and servers, while end-to-end encryption such as OMEMO must be supported and enabled by the clients. See the XMPP Standards Foundation’s OMEMO specification for the protocol-level details.
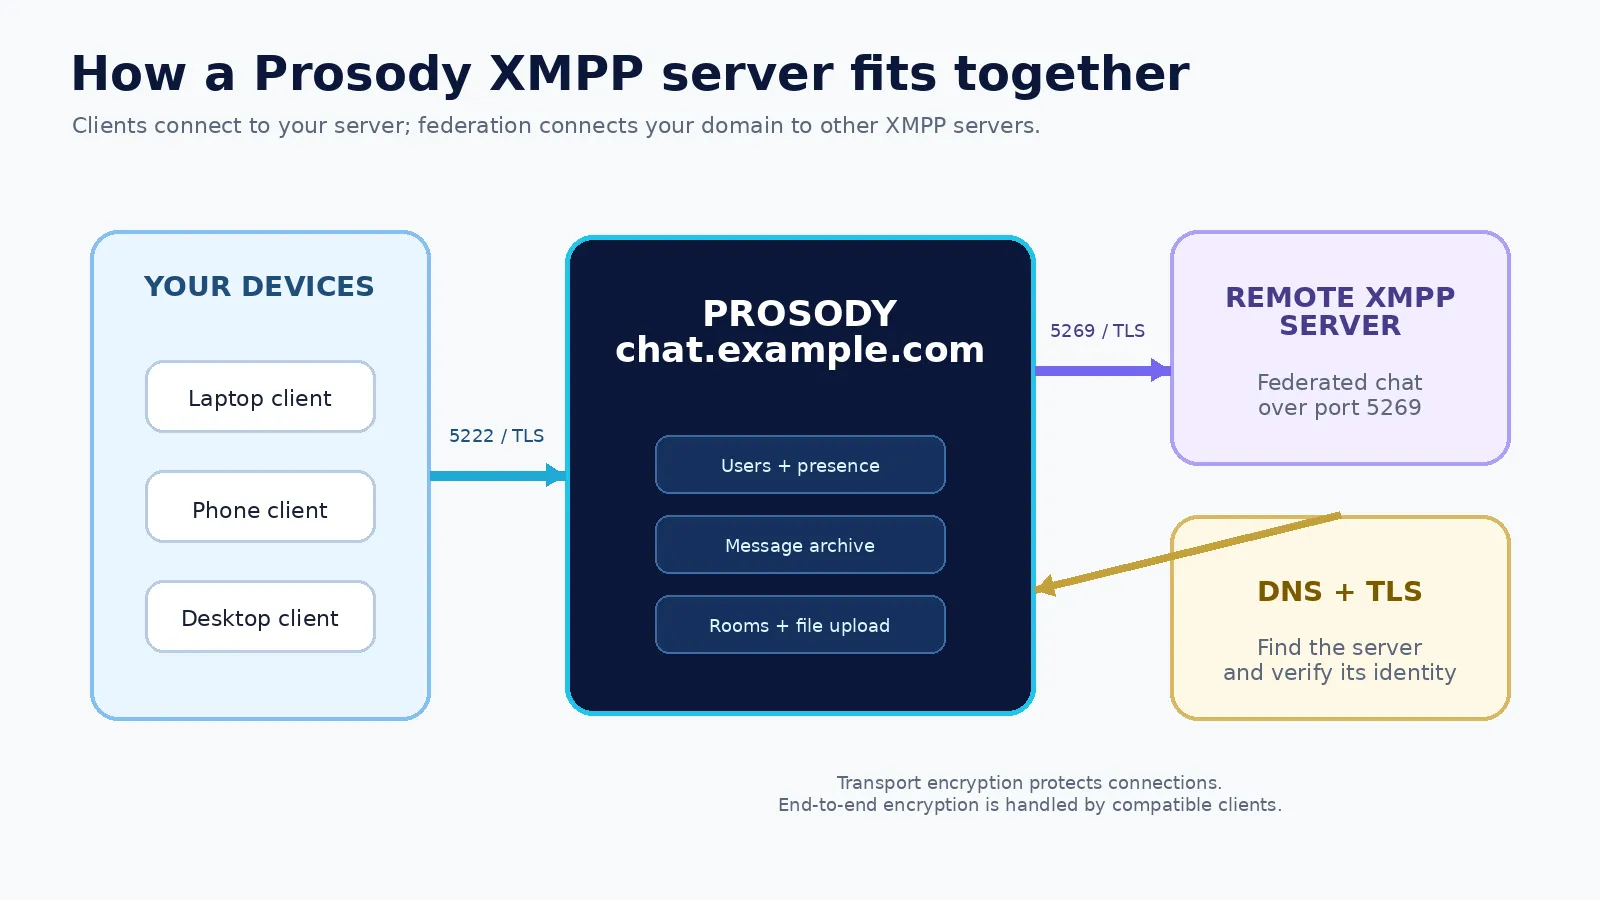
Figure 1. Clients connect to Prosody on port 5222; optional federation uses port 5269.
What you are building
<div class="table-responsive">
<table>
<thead>
<tr>
<th scope="col"><strong>Part</strong></th>
<th scope="col"><strong>Example</strong></th>
<th scope="col"><strong>Purpose</strong></th>
</tr>
</thead>
<tbody>
<tr>
<td>Personal XMPP domain</td>
<td><code>chat.example.com</code></td>
<td>Users sign in as <code>name@chat.example.com</code></td>
</tr>
<tr>
<td>Client connections</td>
<td>TCP 5222 + STARTTLS</td>
<td>Phones and desktop clients connect securely</td>
</tr>
<tr>
<td>Federation</td>
<td>TCP 5269 + TLS</td>
<td>Optional communication with other XMPP servers</td>
</tr>
<tr>
<td>Group chat</td>
<td><code>conference.chat.example.com</code></td>
<td>Multi-user chat rooms</td>
</tr>
<tr>
<td>File sharing</td>
<td><code>upload.chat.example.com</code></td>
<td>HTTP file upload for compatible clients</td>
</tr>
<tr>
<td>Private registration</td>
<td>prosodyctl</td>
<td>Only you create accounts</td>
</tr>
</tbody>
</table>
</div>
This guide deliberately uses chat.example.com as the XMPP domain. That means user addresses look like alice@chat.example.com. It is simpler than using alice@example.com because the XMPP domain points directly at the server and usually does not require SRV records.
Want shorter addresses? You can usealice@example.comwhile hosting the machine atchat.example.com. In that design, setVirtualHosttoexample.comand publish_xmpp-clientand_xmpp-serverSRV records that targetchat.example.com. The TLS certificate must cover the VirtualHost name, not merely the SRV target.
Prerequisites and naming decisions
The instructions below assume Ubuntu 22.04 or 24.04, or Debian 12 or newer. Prosody’s latest stable release was 13.0.6 when this guide was verified on August 6, 2026. If a newer stable release exists when you read this, use it and review its release notes before upgrading an existing server.
- A VPS or Linux server with a public IPv4 address. IPv6 is optional.
- A domain you control and permission to edit its DNS records.
- SSH access to a sudo-enabled user. Avoid routine root logins.
- Ports 5222 and, if you want federation, 5269 reachable from the internet.
- Port 80 temporarily reachable for a Certbot standalone challenge, or an existing web server that can answer the challenge.
- An XMPP client for your phone or computer.
Replace these values before running commands
<div class="table-responsive">
<table>
<thead>
<tr>
<th scope="col"><strong>Example</strong></th>
<th scope="col"><strong>Replace with</strong></th>
</tr>
</thead>
<tbody>
<tr>
<td><code>chat.example.com</code></td>
<td>Your main XMPP domain</td>
</tr>
<tr>
<td><code>conference.chat.example.com</code></td>
<td>Your group-chat service</td>
</tr>
<tr>
<td><code>upload.chat.example.com</code></td>
<td>Your file-upload service</td>
</tr>
<tr>
<td>203.0.113.10</td>
<td>Your server’s public IP address</td>
</tr>
<tr>
<td><code>admin@chat.example.com</code></td>
<td>Your administrator JID</td>
</tr>
</tbody>
</table>
</div>
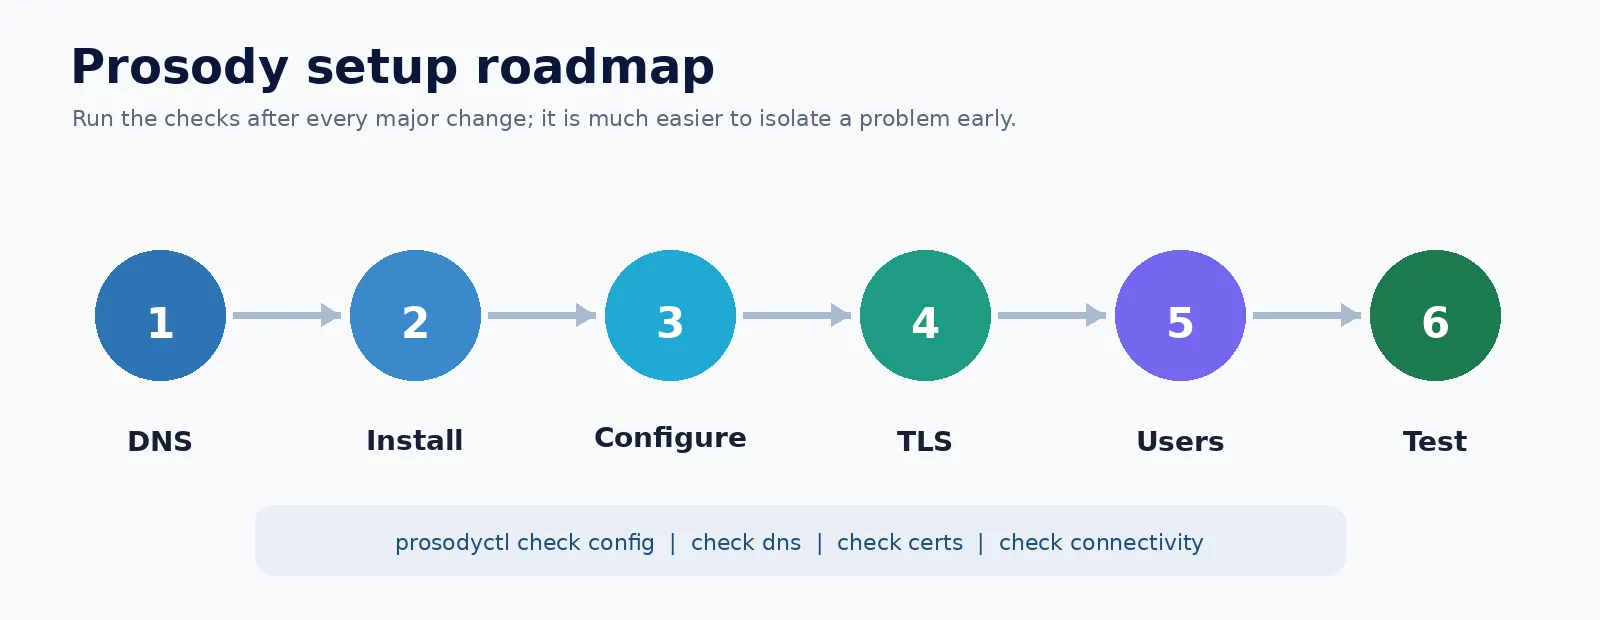
Figure 2. The reliable order for setting up and checking a Prosody server.
Step 1: Create the DNS records
Open your DNS provider’s control panel and create A records for the public names you will use. All three may point to the same VPS.
<div class="table-responsive">
<table>
<thead>
<tr>
<th scope="col"><strong>Type</strong></th>
<th scope="col"><strong>Name</strong></th>
<th scope="col"><strong>Value</strong></th>
<th scope="col"><strong>Use</strong></th>
</tr>
</thead>
<tbody>
<tr>
<td>A</td>
<td>chat</td>
<td>203.0.113.10</td>
<td>Main XMPP service</td>
</tr>
<tr>
<td>A</td>
<td>conference.chat</td>
<td>203.0.113.10</td>
<td>Group-chat component</td>
</tr>
<tr>
<td>A</td>
<td>upload.chat</td>
<td>203.0.113.10</td>
<td>File-upload component</td>
</tr>
</tbody>
</table>
</div>
If your DNS panel expects a full hostname, enter chat.example.com instead of chat. Provider interfaces differ, so always check the preview before saving.
IPv6 warning Add AAAA records only when the server has working public IPv6, Prosody is listening on it, and your firewall permits it. A broken AAAA record can make some clients fail even when IPv4 works.
Wait for DNS to propagate, then confirm the records from your computer or the server:
dig +short chat.example.com A
dig +short conference.chat.example.com A
dig +short upload.chat.example.com A
Each command should return your server’s public IP. Do not continue to certificate issuance until the names resolve correctly.
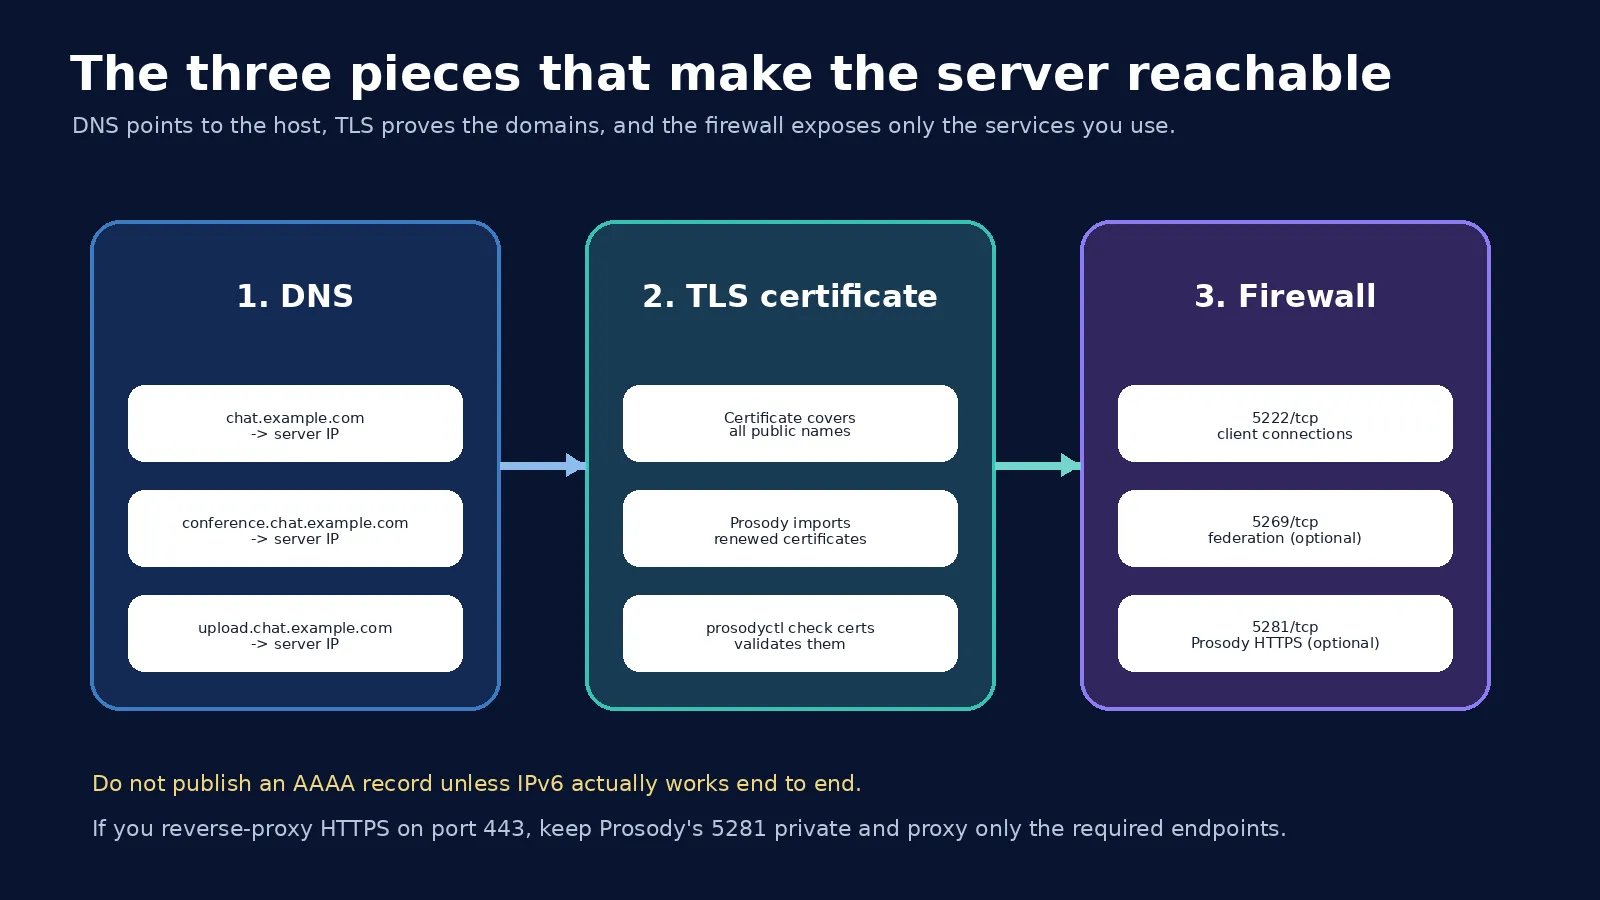
Figure 3. DNS, certificates and firewall rules must describe the same public service names.
Step 2: Install Prosody
The quickest installation is the package in your distribution’s repository:
sudo apt update
sudo apt install -y prosody
Distribution packages can lag behind. For a new server, Prosody’s own APT repository is the more predictable route on Debian 12+, Ubuntu 22.04+ and later supported releases:
sudo apt update
sudo apt install -y wget lsb-release
sudo wget https://prosody.im/downloads/repos/$(lsb_release -sc)/prosody.sources \
  -O /etc/apt/sources.list.d/prosody.sources
sudo apt update
sudo apt install -y prosody
Check the installed version and the paths Prosody is using:
sudo prosodyctl about
systemctl status prosody --no-pager
Version note The official ‘prosody’ repository package follows the latest stable major release and may include breaking major upgrades. Read release notes before upgrading and consider package holds only if you have a deliberate maintenance policy.
Step 3: Configure your XMPP domain
Prosody’s main configuration is normally /etc/prosody/prosody.cfg.lua. Debian-style packages also load individual host files from /etc/prosody/conf.d. Keeping your domain in its own file makes upgrades and troubleshooting easier.
First make a dated backup of the main configuration:
sudo cp /etc/prosody/prosody.cfg.lua \
  /etc/prosody/prosody.cfg.lua.backup-$(date +%F)
Create the virtual-host file:
sudo nano /etc/prosody/conf.avail/chat.example.com.cfg.luaPaste this configuration, after replacing every example domain and administrator address:
VirtualHost "chat.example.com"
    admins = { "admin@chat.example.com" }
    authentication = "internal_hashed"
    allow_registration = false

    modules_enabled = {
        "mam";          -- Message archive
        "smacks";       -- Reliable stream resumption
        "carbons";      -- Sync messages across online devices
        "cloud_notify"; -- Push support for compatible clients
        "csi_simple";   -- Reduce mobile traffic when inactive
        "blocklist";    -- Let users block JIDs
    }

    default_archive_policy = true
    archive_expires_after = "3mon"

Component "conference.chat.example.com" "muc"
    modules_enabled = { "muc_mam" }
    restrict_room_creation = "local"
    muc_log_by_default = true
    muc_log_expires_after = "3mon"

Component "upload.chat.example.com" "http_file_share"
    http_file_share_expires_after = "7 days"
    http_file_share_size_limit = 16*1024*1024
    http_file_share_daily_quota = 100*1024*1024
    http_file_share_global_quota = 1024*1024*1024
This is intentionally conservative. Public registration stays off, archives expire after three months, room creation is limited to local users, and file uploads have per-file, daily and global limits.
Do not replace the global module list blindly The package’s main configuration already enables important modules. The host-specific modules above add capabilities for this domain; they are not a reason to delete the defaults in prosody.cfg.lua.
Enable the host file and check the configuration before restarting anything:
sudo ln -s /etc/prosody/conf.avail/chat.example.com.cfg.lua \
  /etc/prosody/conf.d/chat.example.com.cfg.lua
sudo prosodyctl check config
If the symbolic link already exists, do not create a second one. Edit the existing file and run the check again. Fix every reported configuration error before moving on.
Step 4: Add TLS certificates
Prosody requires a certificate and private key to encrypt and authenticate connections. The certificate names must match the VirtualHost and public Components. For this example, request one certificate containing chat.example.com, conference.chat.example.com and upload.chat.example.com.
Install Certbot, then use its standalone challenge if no other web server is listening on port 80:
sudo apt install -y certbot
sudo certbot certonly --standalone \
  -d chat.example.com \
  -d conference.chat.example.com \
  -d upload.chat.example.com
Already running Nginx or Apache? Do not stop a production website casually. Use the matching Certbot web-server plugin or webroot method instead. The important result is a valid certificate covering every public name Prosody serves.
Prosody’s recommended approach is to import certificates into its own certificate directory. Run the import once:
sudo prosodyctl --root cert import /etc/letsencrypt/live
sudo prosodyctl check certs
Then create a Certbot deploy hook so renewed certificates are imported automatically:
sudo nano /etc/letsencrypt/renewal-hooks/deploy/prosody.shPut these two lines in the file:
#!/bin/sh
/usr/bin/prosodyctl --root cert import /etc/letsencrypt/live
Make the hook executable and test renewal without issuing a live certificate:
sudo chmod +x /etc/letsencrypt/renewal-hooks/deploy/prosody.sh
sudo certbot renew --dry-run
sudo prosodyctl check certs
What TLS does not do TLS protects the network connections to and between servers. It does not make message content invisible to your server. Use an XMPP client with OMEMO support when you need end-to-end encrypted conversations.
Step 5: Open the required firewall ports
Expose only the ports you actually use. The base chat service needs 5222/tcp. Federation needs 5269/tcp. Prosody’s built-in HTTPS service uses 5281/tcp when you expose file uploads directly. SSH and certificate challenges have their own requirements.
<div class="table-responsive">
<table>
<thead>
<tr>
<th scope="col"><strong>Port</strong></th>
<th scope="col"><strong>Service</strong></th>
<th scope="col"><strong>When to open it</strong></th>
</tr>
</thead>
<tbody>
<tr>
<td>22/tcp</td>
<td>SSH</td>
<td>Administrative access; restrict by IP if practical</td>
</tr>
<tr>
<td>80/tcp</td>
<td>ACME HTTP challenge</td>
<td>Needed by Certbot standalone/webroot renewals</td>
</tr>
<tr>
<td>5222/tcp</td>
<td>XMPP client-to-server</td>
<td>Required for normal clients</td>
</tr>
<tr>
<td>5269/tcp</td>
<td>XMPP server-to-server</td>
<td>Required only for federation</td>
</tr>
<tr>
<td>5281/tcp</td>
<td>Prosody HTTPS</td>
<td>Needed for direct file upload/WebSocket HTTPS</td>
</tr>
<tr>
<td>443/tcp</td>
<td>Reverse proxy HTTPS</td>
<td>Use instead of public 5281 when proxying</td>
</tr>
</tbody>
</table>
</div>
A typical UFW configuration for direct Prosody HTTPS looks like this:
sudo ufw allow OpenSSH
sudo ufw allow 80/tcp
sudo ufw allow 5222/tcp
sudo ufw allow 5269/tcp
sudo ufw allow 5281/tcp
sudo ufw enable
sudo ufw status verbose
If you do not want federation, omit 5269. If Nginx or Caddy terminates HTTPS on 443 and proxies to Prosody locally, open 443 and keep 5281 off the public firewall.
Step 6: Create users and start the service
Create the administrator account before enabling any public access. The adduser command prompts for the password without putting it in your shell history:
sudo prosodyctl adduser admin@chat.example.com
sudo prosodyctl adduser friend@chat.example.com
Now validate the configuration and certificates, enable Prosody at boot, and restart it:
sudo prosodyctl check config
sudo prosodyctl check certs
sudo systemctl enable --now prosody
sudo systemctl restart prosody
systemctl status prosody --no-pager
If the service is active and the checks pass, open your XMPP client and sign in with the full JID admin@chat.example.com. Most clients can discover the server from the domain. If yours asks for a hostname and port, enter chat.example.com and 5222 with STARTTLS.
Password handling Use a unique, long password. Do not put real account passwords into scripts, screenshots, articles or shell commands such as prosodyctl register unless you understand the shell-history exposure.
Step 7: Test the complete setup
A green systemd status is not enough. Test configuration, DNS, certificates, listening ports and an actual client login.
<div class="table-responsive">
<table>
<thead>
<tr>
<th scope="col"><strong>Check</strong></th>
<th scope="col"><strong>Command</strong></th>
<th scope="col"><strong>Expected result</strong></th>
</tr>
</thead>
<tbody>
<tr>
<td>Configuration</td>
<td>sudo prosodyctl check config</td>
<td>No errors</td>
</tr>
<tr>
<td>DNS</td>
<td>sudo prosodyctl check dns</td>
<td>Configured domains resolve correctly</td>
</tr>
<tr>
<td>Certificates</td>
<td>sudo prosodyctl check certs</td>
<td>Valid, matching and unexpired</td>
</tr>
<tr>
<td>Features</td>
<td>sudo prosodyctl check features</td>
<td>No missing dependencies for enabled features</td>
</tr>
<tr>
<td>Listening ports</td>
<td>sudo ss -ltnp | grep -E ':(5222|5269|5281)'</td>
<td>Expected ports are listening</td>
</tr>
<tr>
<td>External reachability</td>
<td>sudo prosodyctl check connectivity</td>
<td>Public services reachable</td>
</tr>
<tr>
<td>Logs</td>
<td>sudo journalctl -u prosody -n 100 --no-pager</td>
<td>No repeated TLS, DNS or module errors</td>
</tr>
</tbody>
</table>
</div>
The connectivity check uses an external probing service. If you do not want that, test from another network with your client and a port-checking tool you trust.
Finally, perform real user tests:
- Sign in on two devices using the same account and confirm message synchronization.
- Send a message while one device is offline, reconnect it, and confirm archive retrieval.
- Create or join a room such as
test@conference.chat.example.com. - Upload a small image or document from a compatible client.
- If federation is enabled, exchange messages with an account on another XMPP server.
Optional upgrades
Use clean addresses such as alice@example.com
Change the VirtualHost to example.com and use SRV records to direct clients and remote servers to chat.example.com. Prosody’s official examples use these records:
<div class="table-responsive">
<table>
<thead>
<tr>
<th scope="col"><strong>Record name</strong></th>
<th scope="col"><strong>Priority</strong></th>
<th scope="col"><strong>Weight</strong></th>
<th scope="col"><strong>Port</strong></th>
<th scope="col"><strong>Target</strong></th>
</tr>
</thead>
<tbody>
<tr>
<td>_xmpp-client._tcp.example.com</td>
<td>0</td>
<td>5</td>
<td>5222</td>
<td><code>chat.example.com</code></td>
</tr>
<tr>
<td>_xmpp-server._tcp.example.com</td>
<td>0</td>
<td>5</td>
<td>5269</td>
<td><code>chat.example.com</code></td>
</tr>
</tbody>
</table>
</div>
The SRV target must be a hostname with an A or AAAA record; do not use an IP address. The certificate must cover example.com because that is the VirtualHost your server authenticates as.
Support browser-based XMPP clients
Enable Prosody’s WebSocket module only when you actually need a web client. Browser discovery expects the relevant .well-known/host-meta response on standard HTTPS port 443. Prosody’s default HTTPS port is 5281, so a reverse proxy or a copied static discovery file is usually required. Keep the public URL, Host header and TLS certificate aligned.
-- Add under the VirtualHost when required
modules_enabled = {
    "websocket";
    -- other host modules
}
Do not paste the small example above over your existing modules_enabled list; merge websocket into the list you already have.
Add voice and video calls
XMPP call setup normally needs a TURN/STUN service so media can cross NAT and restrictive networks. Prosody includes mod_turn_external, but you still need a TURN server such as coturn, a shared secret, DNS and additional firewall rules. Treat this as a separate project after text chat is stable. Run prosodyctl check turn when you configure it.
Choose a different storage backend
The default file-based storage is reasonable for a small personal server. SQL can make sense when you have more users, stronger operational tooling or a specific backup strategy. Do not migrate storage merely because a database sounds more professional; test export, import and restore procedures first.
Security, backups and updates
Keep registration private
Leave allow_registration = false unless you are prepared to handle automated signups, spam and abuse reports. For a personal site, prosodyctl adduser or invitation-based onboarding is safer and simpler.
Use transport and end-to-end encryption correctly
Keep c2s encryption required, maintain valid certificates and use clients that support OMEMO when message confidentiality from the server matters. These are different layers: server TLS protects connections; OMEMO protects message content between compatible endpoints.
Back up configuration and data
The two locations that normally matter on Debian-style installations are /etc/prosody for configuration and certificates, and /var/lib/prosody for user and service data. A simple consistent backup can stop the service briefly, archive both locations, then start it again:
sudo systemctl stop prosody
sudo tar -C / -czf /root/prosody-backup-$(date +%F).tar.gz \
  etc/prosody var/lib/prosody
sudo systemctl start prosody
Copy the archive to encrypted storage on another machine. A backup that lives only on the same VPS is not protection against VPS loss. Test restoration on a disposable server before you depend on the backup.
Update with a check-first routine
sudo prosodyctl check config
sudo apt update
apt list --upgradable
sudo apt upgrade
sudo prosodyctl about
sudo prosodyctl check config
sudo prosodyctl check certs
systemctl status prosody --no-pager
Before a major Prosody upgrade, read the release notes, back up the server and review deprecated configuration options. The official upgrade guide recommends running prosodyctl check config before changing versions.
Troubleshooting
<div class="table-responsive">
<table>
<thead>
<tr>
<th scope="col"><strong>Symptom</strong></th>
<th scope="col"><strong>Likely cause</strong></th>
<th scope="col"><strong>What to check</strong></th>
</tr>
</thead>
<tbody>
<tr>
<td>Client cannot connect</td>
<td>Wrong DNS, closed 5222, Prosody not listening</td>
<td>Check dig, UFW, ss -ltnp and systemctl status</td>
</tr>
<tr>
<td>Certificate warning</td>
<td>Certificate does not cover the VirtualHost or import failed</td>
<td>Run check certs; verify SAN names; re-run cert import</td>
</tr>
<tr>
<td>Federation fails</td>
<td>Closed 5269, bad DNS/SRV or TLS mismatch</td>
<td>Run check dns and connectivity; inspect journal</td>
</tr>
<tr>
<td>Upload fails</td>
<td>Missing upload DNS/certificate, 5281 blocked or quota reached</td>
<td>Check module URL, certificate, firewall and quotas</td>
</tr>
<tr>
<td>Config check fails</td>
<td>Lua syntax error, wrong module name or duplicate block</td>
<td>Read the exact line number; compare quotes, semicolons and braces</td>
</tr>
<tr>
<td>Service restarts repeatedly</td>
<td>Fatal config/module/dependency error</td>
<td>Use journalctl -u prosody -b --no-pager</td>
</tr>
<tr>
<td>One network works, another does not</td>
<td>Broken IPv6 or split DNS</td>
<td>Compare A/AAAA results and remove unusable AAAA records</td>
</tr>
</tbody>
</table>
</div>
A reliable debugging order
1. Read the exact Prosody error instead of changing several settings at once.
2. Run prosodyctl check config, then check dns, then check certs.
3. Confirm the process is running and the expected ports are listening.
4. Inspect the most recent journal entries.
5. Test locally, then from a different network.
6. Change one thing, rerun the same failed check, and keep notes.
Final checklist
- All public names resolve to the intended server.
prosodyctl aboutreports the expected stable Prosody version.prosodyctl check configreports no errors.- Certificates cover the VirtualHost and public Components.
- Only required firewall ports are open.
- Public registration is disabled unless intentionally managed.
- Two devices can sign in and synchronize messages.
- Group chat and upload work if you enabled them.
- A current off-server backup exists and restoration has been tested.
- You know where to read logs and how to run the health checks.
Once every item passes, you have a usable self-hosted Prosody XMPP server rather than a daemon that merely happens to be running. Keep the configuration small, document each optional module, and treat DNS, certificates and backups as part of the service—not as one-time setup chores.
Authoritative sources
- Prosody — Downloading and Installing
- Prosody — Official APT Package Repository
- Prosody — Configuring Prosody
- Prosody — DNS Configuration
- Prosody — Certificates
- Prosody — Let’s Encrypt Integration
- Prosody — Port and Network Configuration
- Prosody — prosodyctl
- Prosody — Creating Accounts
- Prosody — Chatrooms
- Prosody — Message Archive Module
- Prosody — HTTP File Share Module
- XMPP Standards Foundation — XMPP Overview
- XMPP Standards Foundation — OMEMO Encryption
Frequently asked questions
Is Prosody free?
Yes. Prosody is open-source XMPP server software. Your costs are the server, domain and any operational services you choose.
Do I need a domain name?
For a public, properly secured XMPP service, yes. Local testing can use temporary arrangements, but real clients and federation depend on stable DNS names and matching certificates.
Which ports does Prosody need?
Port 5222/tcp is the standard client connection port. Port 5269/tcp is used for server-to-server federation. Prosody HTTPS commonly uses 5281/tcp, while a reverse proxy normally exposes 443/tcp.
Can I use Prosody without federation?
Yes. Keep port 5269 closed and use the server only for your own local accounts. Group chat and file upload can still work for local users.
Are Prosody messages end-to-end encrypted by default?
No. TLS encrypts network connections. End-to-end encryption depends on compatible clients and a protocol such as OMEMO.
How do I create a Prosody user?
Run sudo prosodyctl adduser user@your-xmpp-domain and enter the password at the prompt.
Can I run Prosody behind Nginx or Caddy?
Yes for HTTP-based features such as WebSocket and file upload. Native XMPP ports still need TCP handling. Make sure external URLs, Host headers and certificates match.
How much server power does a personal Prosody instance need?
A small personal server is lightweight. Capacity depends more on user count, message archives, file uploads, calls and retention policies than on the base daemon.
Comments & rating
Share your experience or reply to an existing discussion.
0 comments